
Getting started
1.How the connector works
You create and post your invoices in Odoo as usual. The connector then puts them in Twinfield by itself. That's all.
- What goes to Twinfield: customer invoices, vendor bills, credit notes, new customers and suppliers, and changes to customers and suppliers.
- One way: nothing ever comes back from Twinfield into your Odoo invoices, customers or settings. Only whether an invoice is paid is read and shown in the connector.
- Nothing lost: if something can't go yet, it waits and goes later by itself.
More details
What a booking looks like
One line for the customer or supplier (the total) and one line per ledger account and VAT code with the summed amount and VAT. Every line has the invoice number and the name as description (max. 40 characters), for example INV/2026/00004 Smith Bakery. Products, quantities and prices stay in Odoo.
The ERP2XL connection service
The connector works through the ERP2XL connection service. It keeps the access to Twinfield encrypted, so nobody needs to enter a Twinfield password in Odoo. Odoo gets a key that is valid for one hour at a time. The invoices themselves go directly from Odoo to Twinfield, not through ERP2XL.
Who can do what in Odoo
| Role in Odoo | Can |
|---|---|
| Invoicing user | See everything, change nothing |
| Accounting manager | Map, approve, send and correct |
| Administrator | Connect to Twinfield and change the settings |
Where the connector keeps its data
Only in its own tables. No fields are added to Odoo's invoices, customers, taxes or journals. Of Twinfield relations the connector only keeps the number, never names or addresses.
2.What you need
- Odoo 19 (Community or Enterprise) on your own server or Odoo.sh.
- A Twinfield subscription and a Twinfield user with access to your administration.
- An https address where your Odoo can be reached from outside, such as
https://erp.yourcompany.com. - Administrator rights in Odoo to install and connect.
Tip: create a separate Twinfield user for the connection, for example "Odoo connection", with access to the needed administration only. The connection then keeps working when an employee leaves.
More details
- Odoo Online does not allow custom modules; the connector doesn't work there.
- Community needs the Invoicing app.
- The https address is needed because Twinfield sends you back there after logging in, and because the connection service uses it to check that it really is your Odoo.
- Several databases on one server? Then the address must open exactly this database (dbfilter).
- An accountant with many administrations best creates a separate Twinfield user per client with only that administration. The Twinfield access applies to all administrations the user can reach.
3.Installing
- Put the folder
erp2xl_twinfieldwith the custom modules of your Odoo server. - Restart Odoo.
- Go to Apps, click Update Apps List, search Twinfield and click Activate.
You now have a Twinfield menu. Always start at Twinfield › Overview: it shows the steps still to do.
More details
The menu
- Overview: the setup steps, what needs attention and the activity.
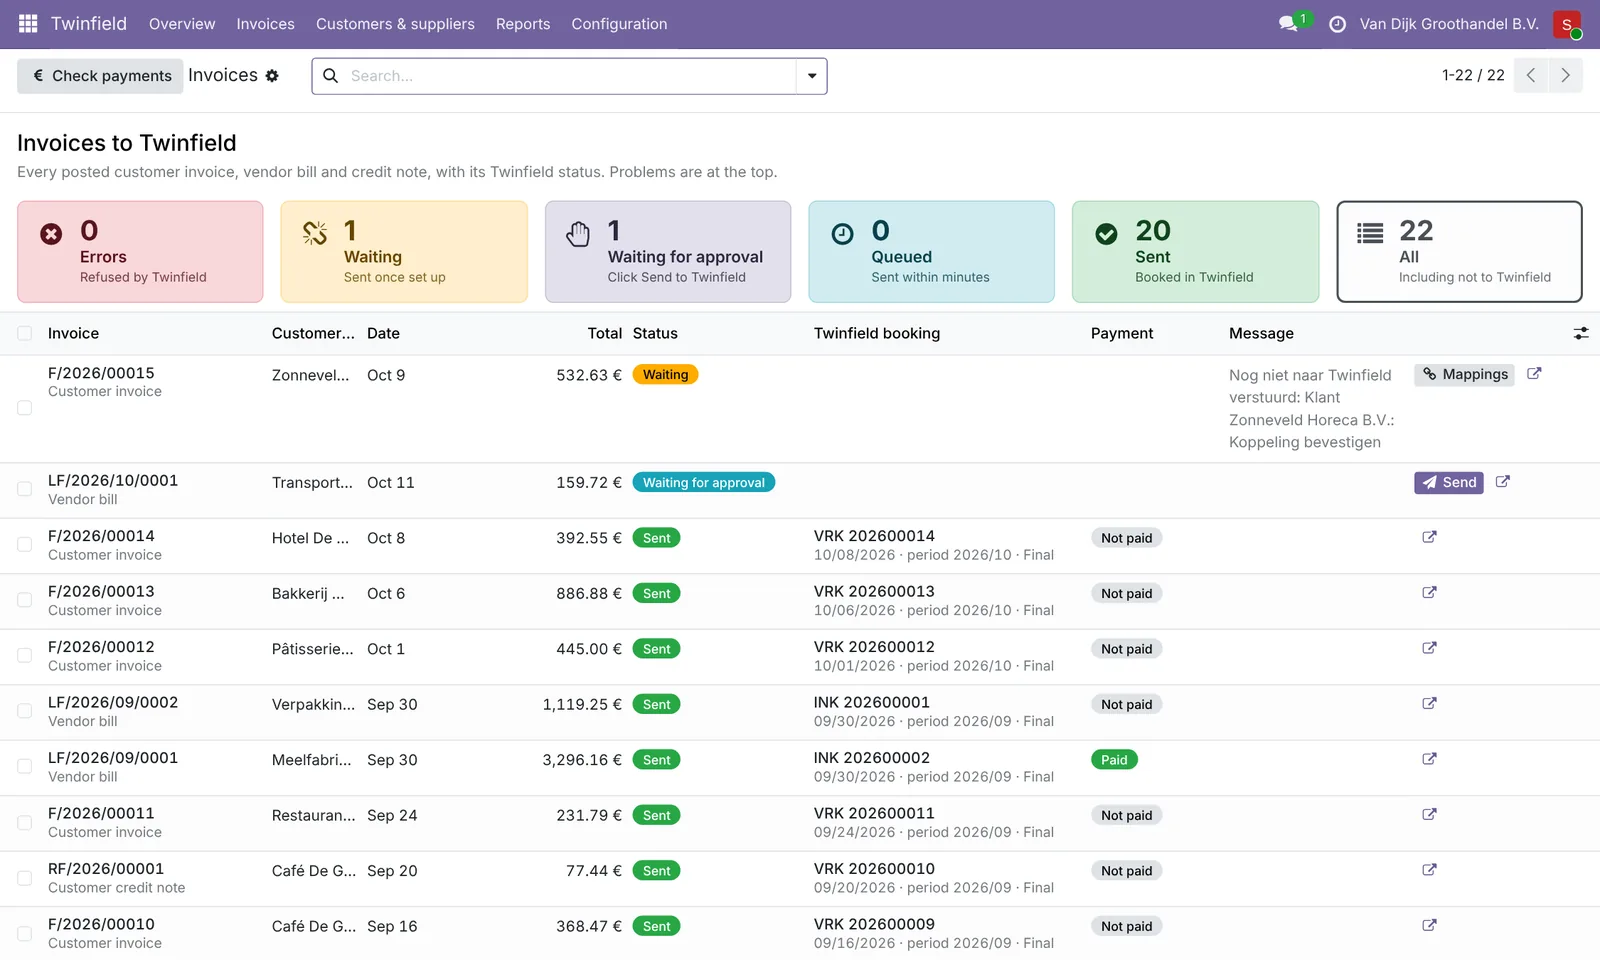
- Invoices: every posted invoice with Twinfield status and payment status.
- Customers & suppliers: links to Twinfield numbers and changes.
- Reports: Payments & revenue and the Log.
- Configuration: Settings, Connection, Mappings and Twinfield data.
Updates
Put the new folder in place, restart Odoo and click Upgrade on the module in Apps. Your settings and mappings stay.
On Odoo.sh you add the folder to your repository; Odoo.sh installs it with the next build.
4.Connecting to Twinfield
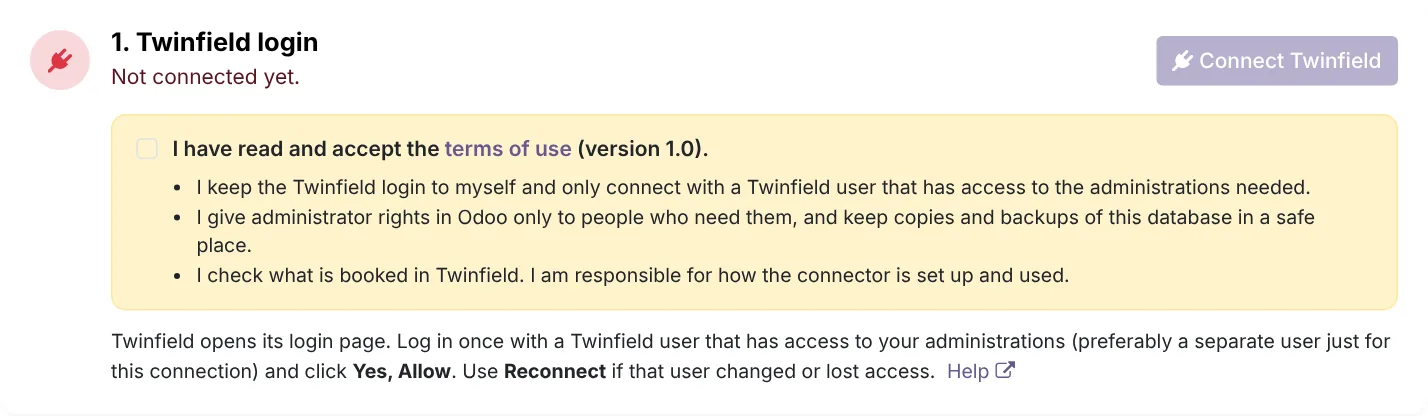
Go to Twinfield › Configuration › Connection (administrators only).
- Read the terms of use and tick the box that you accept them.
- Click Connect Twinfield.
- Log in at Twinfield with the connection user and click Yes, Allow.
- You are back in Odoo and see Connected.
Done. Nobody needs to log in again after this.
More details
The first time
Your Odoo database registers itself with the ERP2XL connection service. No licence key is needed. You get a customer number, shown on the same page. Mention it when you contact us.
Buttons on the Connection page
- Test connection: checks that everything works and shows how many administrations are available.
- Reconnect: log in with another Twinfield user, or when the user lost access.
- Refresh administrations: when an administration was added in Twinfield.
- Disconnect Twinfield: stops sending. New invoices wait until you connect again.
The Odoo address
At the bottom is the Odoo address for Twinfield. It is filled in on the first connect with the address you are working on (always as https). Odoo's own settings don't change. If your Odoo gets a new address, change it here and connect again.
Doesn't work?
See Solving problems, under "Could not check this Odoo".
5.Administration and start date
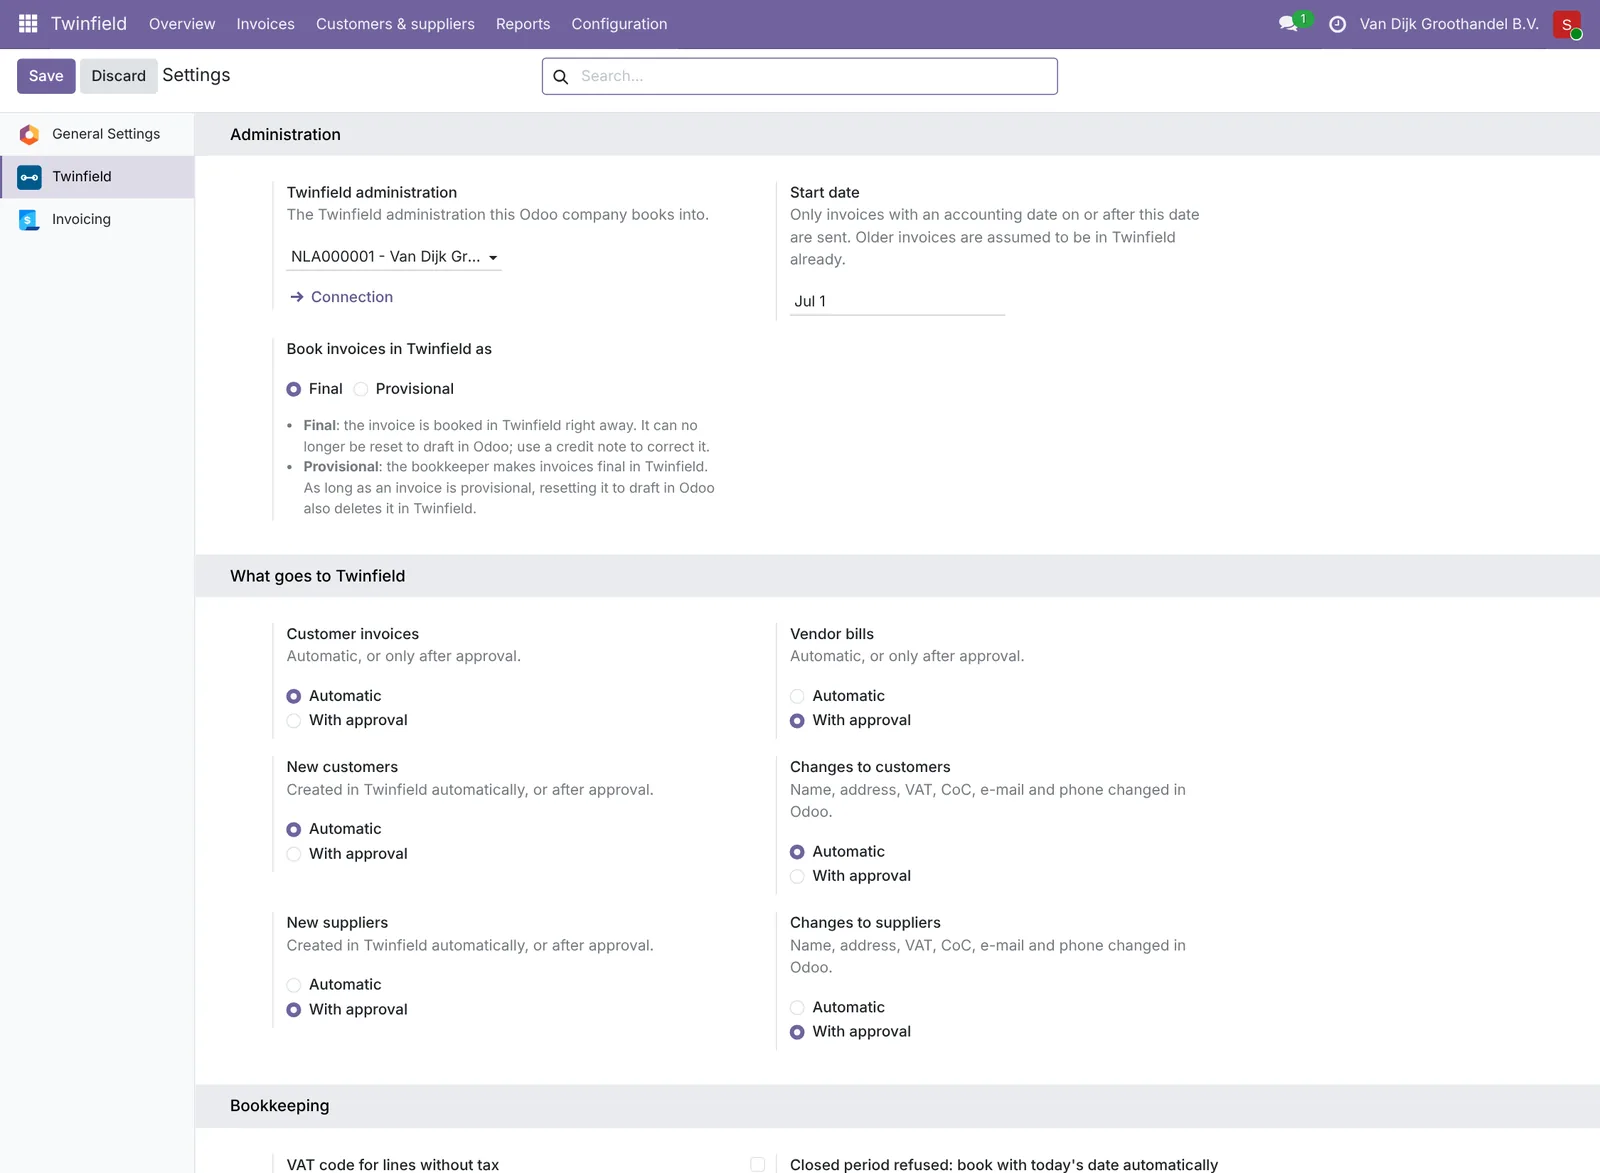
Go to Twinfield › Configuration › Settings and choose:
- The Twinfield administration this company books into.
- A start date. Only invoices from this date go to Twinfield. Choose, for example, the first day of the quarter you start with.
More details
- The start date looks at the accounting date of the invoice. Invoices from before that date are never sent, not later either.
- Several companies in Odoo? Switch company at the top right and set up each company separately. Each company can have its own administration.
- You see all administrations the Twinfield user can reach. One missing? Click Refresh administrations on the Connection page.
Choosing another administration (for example with a new accountant)? Then mappings to the old administration become conflicts, with a suggestion for the same code. Invoices wait until you have mapped them again. Customers and suppliers get a number in the new administration; what was already sent stays in the old one.
6.Fetching the Twinfield data
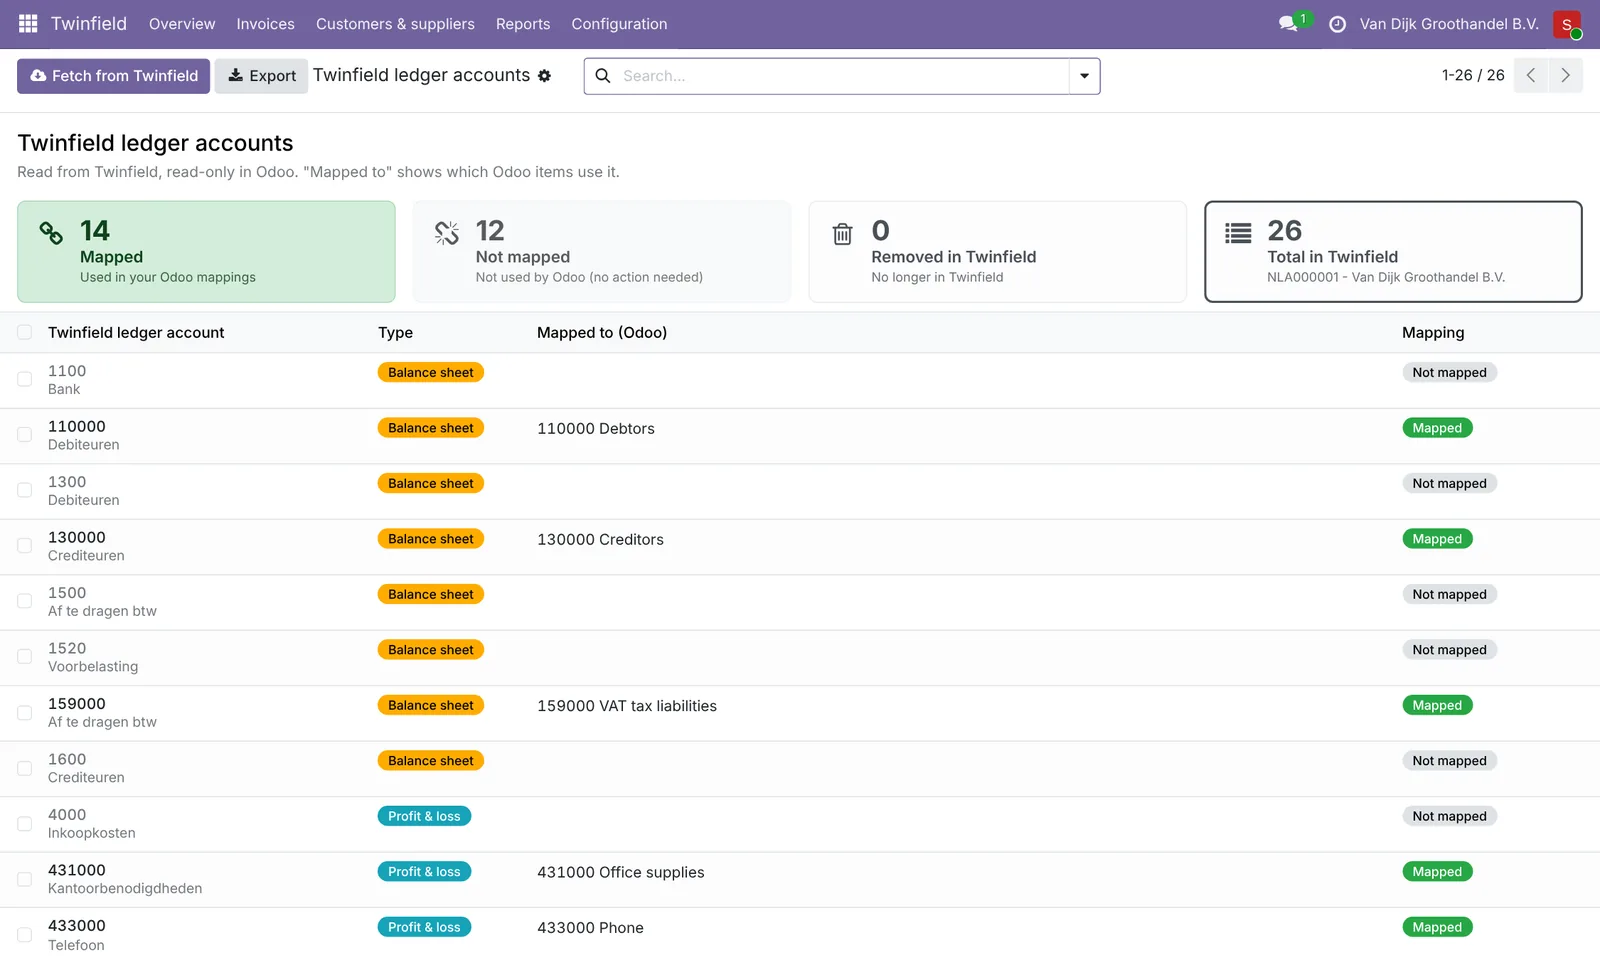
Click Fetch from Twinfield in the overview. The connector reads the VAT codes, ledger accounts and daybooks of your administration, so you can map them. Nothing changes in Twinfield.
More details
- Fetch again when you add or change a VAT code, ledger account or daybook in Twinfield.
- You can fetch at most once per 10 minutes.
- Twinfield limits the number of requests per minute. When that limit is reached halfway, fetching continues in the background by itself and you get a message when it is done. If it takes longer than 2 hours, it stops; then fetch again.
- Codes no longer in Twinfield are archived, and the suggestions are updated.
- What was fetched, and what is mapped to it, is in Configuration › Twinfield data.
7.Which VAT does this company use?
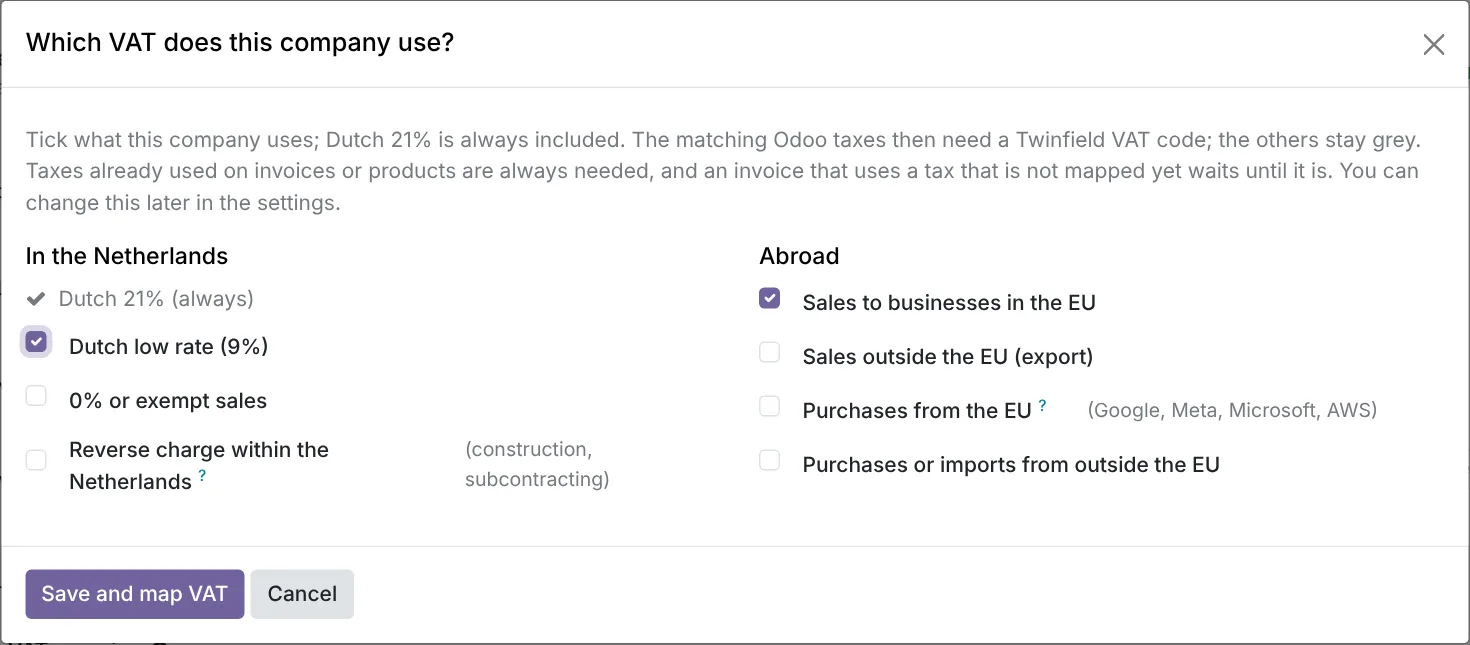
Tick which VAT the company uses. 21% is always on. The connector then knows which taxes need a mapping, and doesn't ask for the rest.
- In the Netherlands: 9%, 0% and reverse charge.
- Abroad: sales within the EU, export, purchases within the EU and imports.
Click Save and map VAT.
More details
- You find the question in the overview, at the top of the VAT mapping screen and in the Settings (block VAT profile).
- For each kind the connector picks one Odoo tax, based on the box of the Dutch VAT return (1a, 1b, 3b, etc.): one already in use, otherwise the first. A Dutch company with 21% and 9% maps four taxes this way (sales and purchases).
- EU sales and export also make the ledger accounts of the matching fiscal positions needed.
- Not sure? Leave it off. If an invoice later uses another tax, that invoice waits and you see which tax still needs a mapping.
8.Mapping: VAT, ledger accounts and daybooks
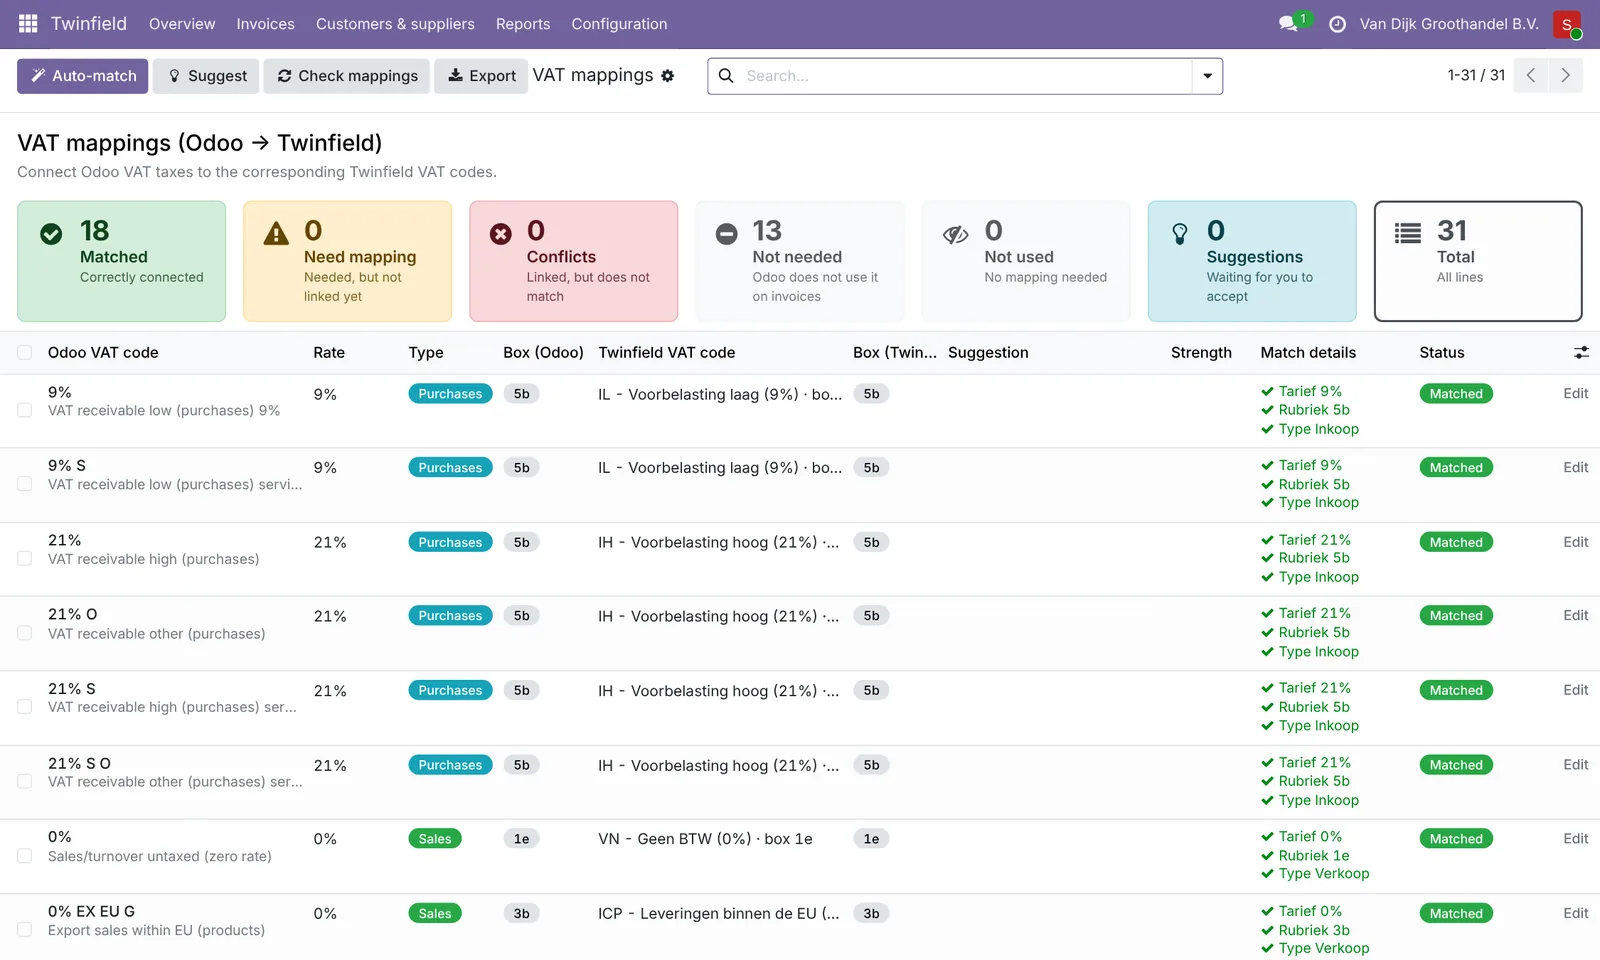
Mapping means: saying which Twinfield code belongs to which Odoo item. Go to Twinfield › Configuration › Mappings and go through the three screens: VAT, Ledger accounts and Daybooks.
- Click Auto-match. What is certain gets mapped.
- The rest shows a suggestion. Click it, or choose a code yourself.
- Everything on Matched? Then you are done.
Only what you really use needs a mapping. The rest is grey.
More details
What needs a mapping
Taxes and accounts on invoices of the last 12 months, the company's defaults, what is set on products and product categories, and the sales and purchase journals. When an invoice later uses something new, it automatically becomes Needs mapping.
Statuses
| Status | Meaning |
|---|---|
| Matched | All fine. |
| Needs mapping | Used, but not mapped yet. |
| Conflict | The code no longer fits, for example because it was deleted in Twinfield or changed type. |
| Not used | You said this never goes to Twinfield. Use again puts it back. |
| Grey | Not needed, not used now. |
What Auto-match does
- VAT: same type (sales/purchase), same rate and a single box.
- Ledger accounts: same number and same type.
- Daybooks: sales → VRK, purchases → INK.
- VAT in two boxes (EU, import, reverse charge) is always mapped by you.
Handy
- Check mappings checks everything again.
- Export gives a list, for example for your accountant.
- Nothing is ever mapped by itself while invoices are sent. If a mapping is missing, the invoice waits with exactly what is missing and an Open mappings button. Once mapped, it goes by itself.
9.Automatic or with approval
In Twinfield › Configuration › Settings you choose per kind: Automatic (goes by itself) or With approval (waits until someone clicks Approve).
Our advice: start with approval and check the first invoices and relations in Twinfield. All correct? Then set everything to automatic. From then on you never have to look back at invoices, credit notes or changes to customers and suppliers. You only get a heads-up (in the overview and the daily email) when something needs attention.
More details
The kinds
- Customer invoices
- Vendor bills
- New customers
- Changes to customers
- New suppliers
- Changes to suppliers
Other settings
- Provisional or final booking. A provisional booking can still be deleted (see Resetting or unlinking an invoice); a final one can't.
- Daily summary e-mail: an e-mail address that hears every day what needs attention. Only when there is something.
- Closed period: see Solving problems.
New customers and suppliers always get their number from Twinfield. Set the number range in Twinfield under the dimension types (DEB and CRD).
Daily use
10.The overview
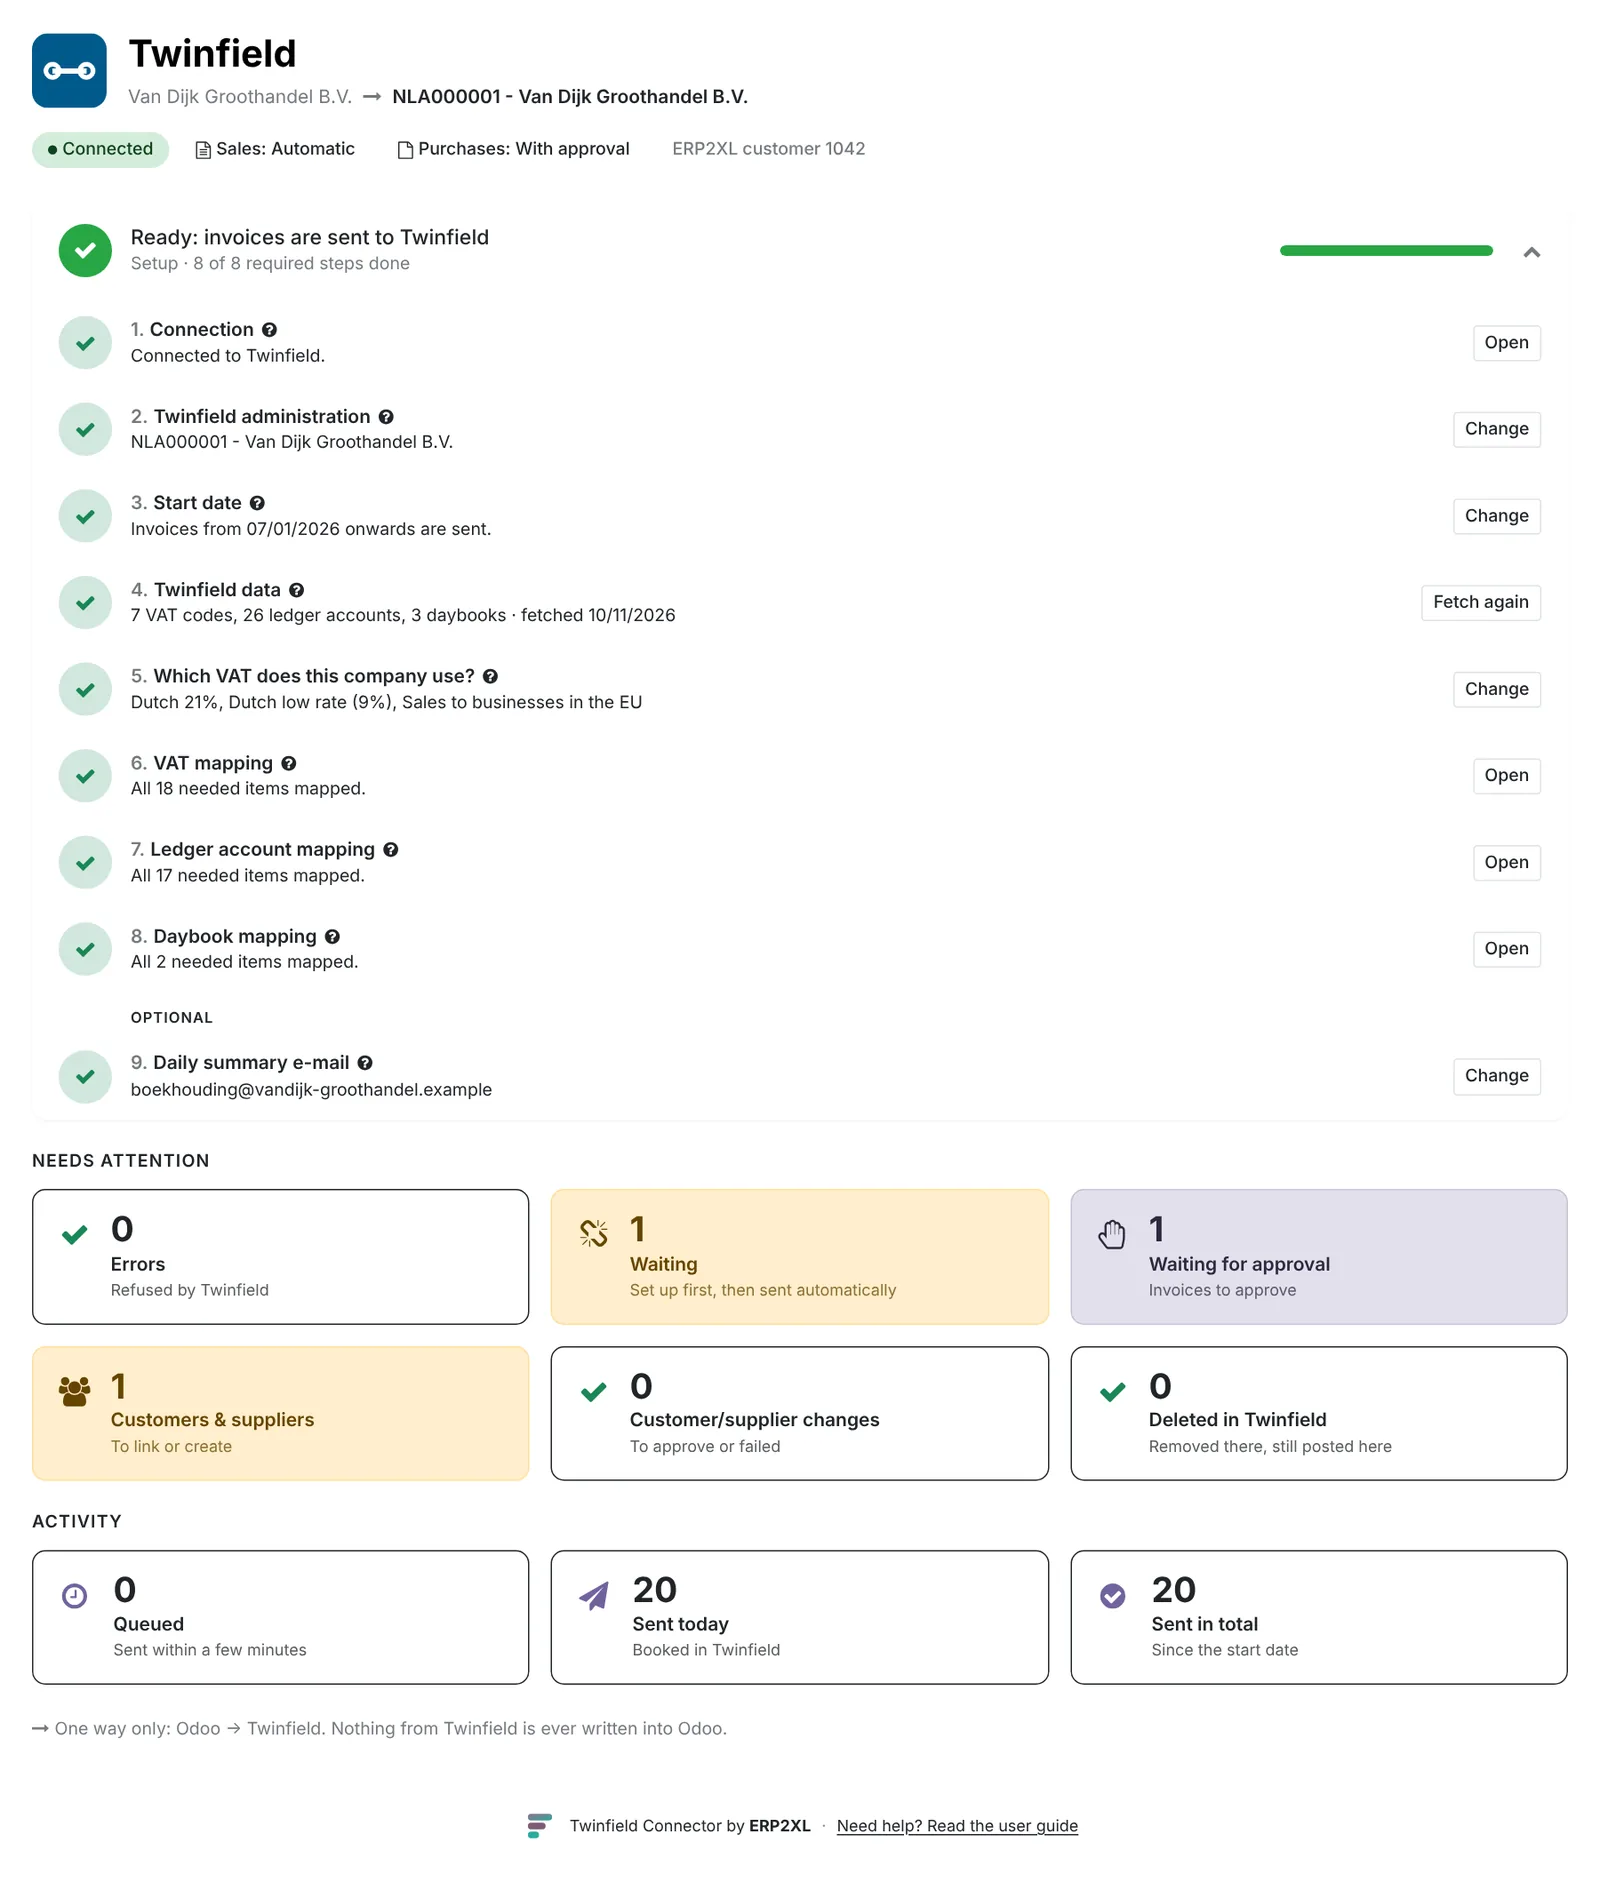
Twinfield › Overview is your starting point. At a glance you see:
- Setup: which steps are still to do. Green is done.
- Needs attention: tiles with what is waiting or went wrong. Click a tile for the list.
- Activity: what is queued and what was sent.
All tiles on zero? Then everything is running.
More details
The Needs attention tiles
- Errors: refused by Twinfield.
- Waiting: set something up first, then it goes by itself.
- Waiting for approval: invoices to approve.
- Customers & suppliers: to link or create.
- Changes: changes to customers or suppliers to approve, or failed.
- Deleted in Twinfield: removed there, still posted here.
Daily e-mail and log
Enter an e-mail address in the Settings for the daily summary e-mail. It only comes when something needs attention. Everything the connector does is in Reports › Log.
When does what happen
| What | How often |
|---|---|
| Sending invoices | Every 5 minutes (or right away with Send now) |
| Changes to customers and suppliers | Every 15 minutes |
| Reading the payment status | Every hour |
| Looking for deleted bookings, summary e-mail | Every day |
11.Invoices
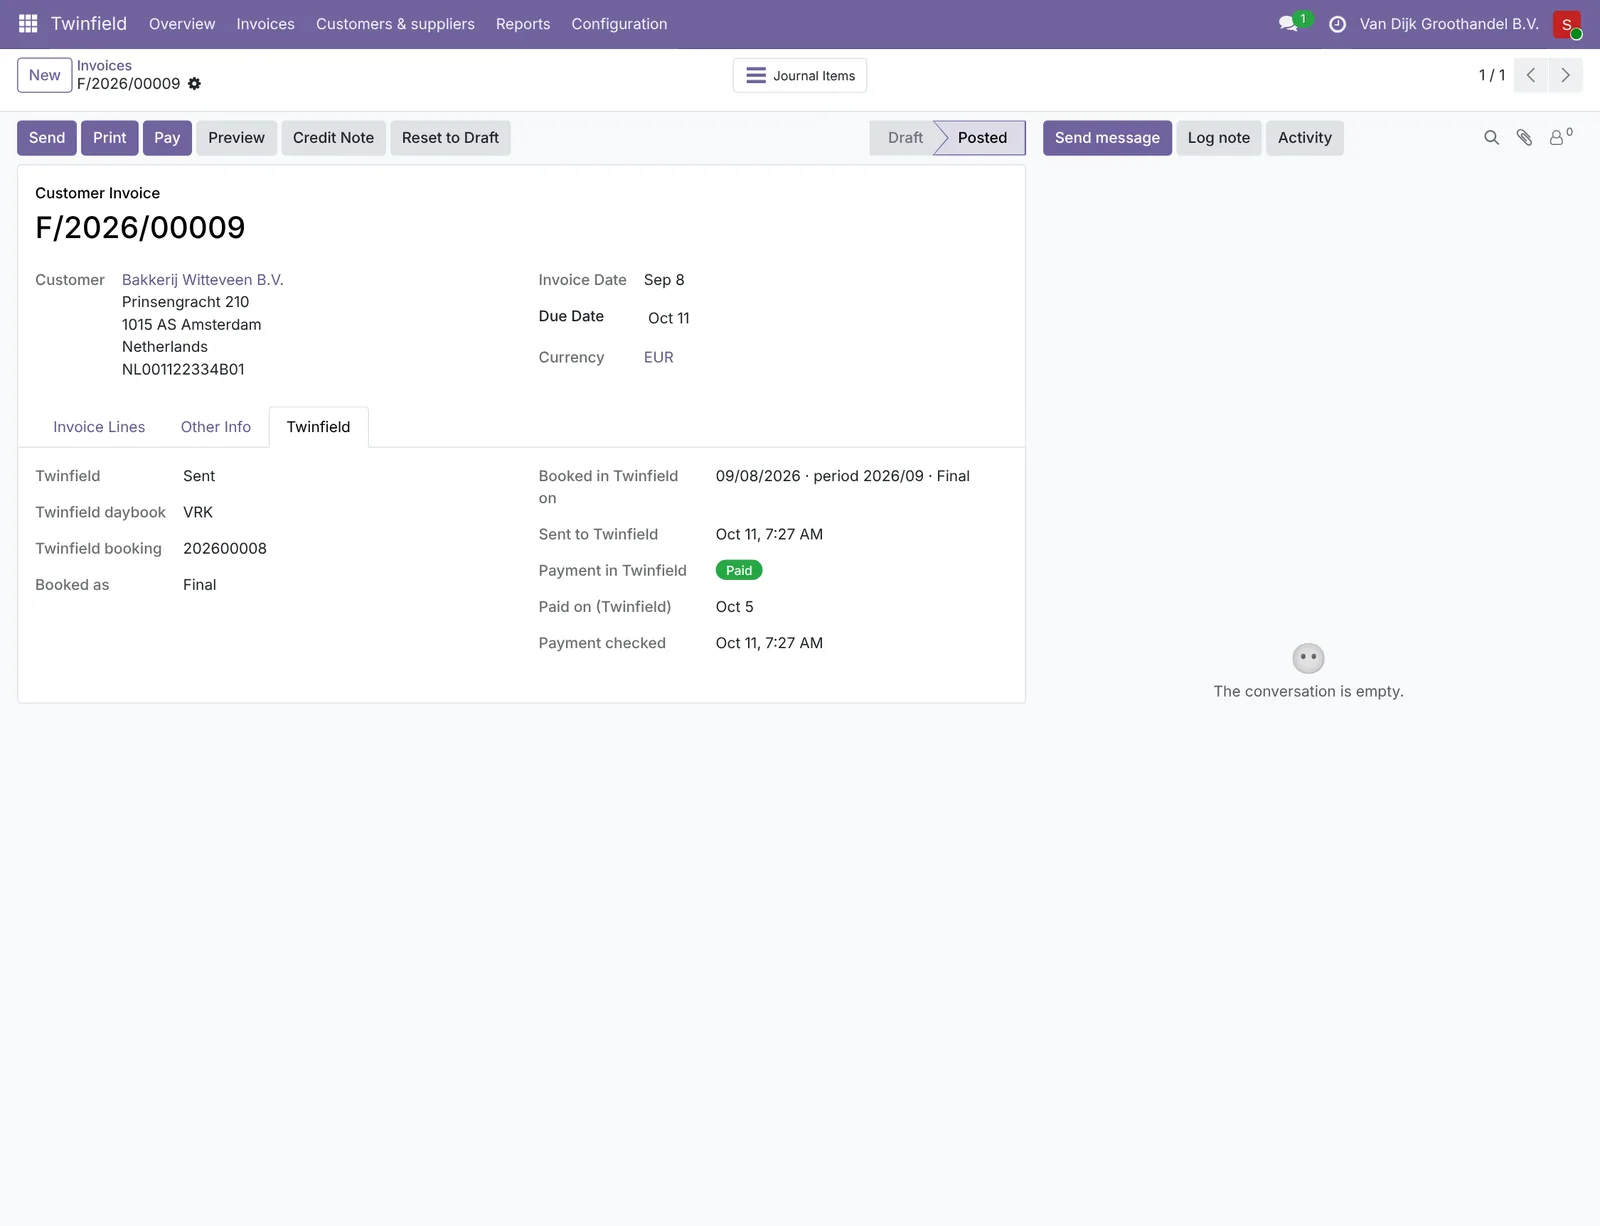
Create and post your invoice in Odoo as always. Done: within a few minutes it is in Twinfield. That goes for customer invoices and vendor bills.
On the invoice, the Twinfield tab shows the status, and after sending the daybook and booking number. All invoices together are in Twinfield › Invoices.
More details
Statuses
| Status | Meaning | What you do |
|---|---|---|
| Queued | Goes within a few minutes. | Nothing. |
| Waiting for approval | Setting "with approval". | Click Approve. |
| Waiting | Something is missing: a mapping or a decision about the customer. | Follow the message. Then it goes by itself. |
| Sent | In Twinfield. | Nothing. |
| Error | Twinfield refused it. The reason is shown. | Solve it and Send again. |
| Not to Twinfield | For example an invoice without amounts. | Nothing. |
| Deleted in Twinfield | Someone removed the booking in Twinfield. | Choose: send again or not. |
| Unlinked from Twinfield | Unlinked on purpose (see Correcting). | Nothing. |
Good to know
- Never twice: if the invoice number is already booked on that customer or supplier in Twinfield, the invoice is not sent again but marked "Already in Twinfield".
- One VAT per line: Twinfield needs one VAT code per line. A line with a group of taxes waits.
- Foreign currency: the invoice goes in that currency and Twinfield converts with its own rate. The currency must exist in Twinfield.
- EU sales: for sales within the EU (ICP) the connector sends whether it concerns goods or services, the customer's country and VAT number and, for services, the date.
- An invoice with an error doesn't hold up the rest: other invoices keep going.
- Each send round takes at most 50 invoices; if there are more, the next round follows right away.
12.Customers and suppliers
You don't need to create customers and suppliers in Twinfield yourself.
- Does the relation already exist in Twinfield with the same VAT or Chamber of Commerce number? Then the connector links it by itself.
- New customer or supplier? The connector creates it in Twinfield with the first invoice. Twinfield gives the number.
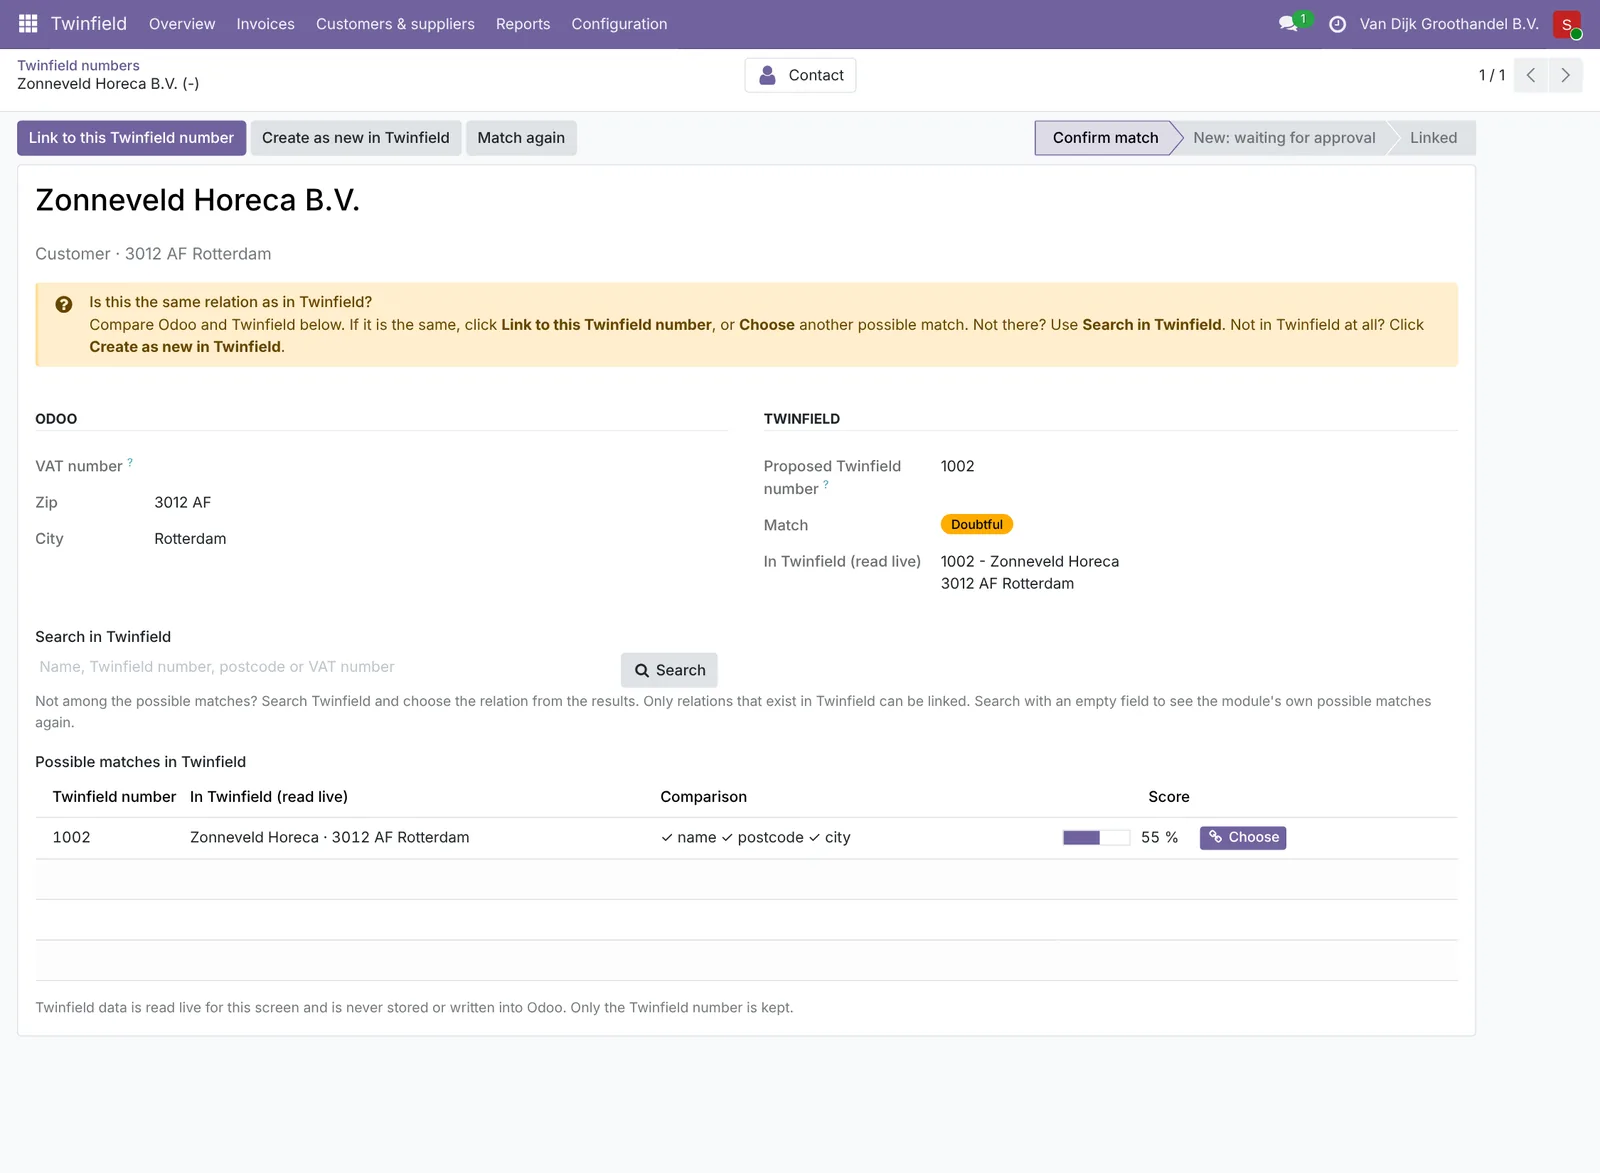
- In doubt? Then the connector asks you, in Twinfield › Customers & suppliers.
When you change an address or VAT number in Odoo, that change goes to Twinfield too.
More details
How the connector searches
- By VAT number (without country code), then by Chamber of Commerce number. Exactly one hit: linked by itself, even if the name differs.
- Otherwise by postcode and the longest word of the name. The best three appear as possible matches, with per detail ✓ (same), ≈ (similar) or ✗ (different). Click Choose on the right one.
- Same name but a different VAT number: VAT number conflict. You decide; invoices wait.
- Nothing found: create in Twinfield (automatically or after approval).
Searching yourself
The right one isn't listed? Use Search in Twinfield. Digits only searches by Twinfield number, a postcode or VAT number searches the address, text searches by name. You always choose from relations that really exist in Twinfield.
Linked to the wrong one?
Click Unlink (accounting manager). The relation stays on screen so you can choose or create the right one right away. New invoices wait until then; sent invoices stay on the old number. Match again searches Twinfield again right away.
Changes
- What goes along: name, address, VAT number, Chamber of Commerce number, e-mail, phone and website.
- Attention (t.a.v.): the name of the contact of type Invoice address under the company goes to the attention field in Twinfield. No invoice contact? Then the attention in Twinfield stays as it is.
- Changes made in Twinfield are ignored; Odoo never changes.
- Payment terms, credit limits and bank details in Twinfield are never touched.
- The Chamber of Commerce number comes from the Company ID field, or else from the Peppol address with scheme 0106.
Names and addresses from Twinfield are only read briefly in memory (10 minutes), never stored.
13.Credit notes
You create a credit note in Odoo as always: open the invoice and click Credit Note. Post it, and the connector sends it to Twinfield, just like an invoice.
That works for sales and purchases, for the full amount or part of it.
More details
- The credit note goes into the same daybook as the invoice, on the same customer or supplier, with negative amounts.
- If the customer or supplier isn't linked yet, the credit note waits for that, just like an invoice.
- Want to clean up or cancel invoice and credit note in Odoo afterwards? See Resetting or unlinking an invoice.
- Matching (invoice against credit note) is done in Twinfield. The connector then reads that they are paid.
14.Resetting or unlinking an invoice
Made a mistake in an invoice that was sent? The simplest and always correct way: create a credit note and then a new invoice.
Would you rather reset the invoice to draft in Odoo?
- Booked provisionally in Twinfield: that's possible. After your confirmation the connector removes the booking in Twinfield.
- Booked final: not possible, because Twinfield doesn't delete final bookings. Use a credit note.
More details
Sometimes you really want to cancel an invoice in Odoo, for example to be able to cancel its purchase order. For that the accounting manager has two buttons.
Unlink with credit note
- Create a credit note for the full amount and let it be sent.
- Click Unlink with credit note on the invoice (Twinfield tab) or in Twinfield › Invoices.
- Invoice and credit note become Unlinked from Twinfield. You can reset them to draft in Odoo and cancel them.
Both bookings stay in Twinfield; together they come to zero. Nothing is sent or deleted there.
Unlink together (zero balance)
Several documents of one customer or supplier that together come to zero? Select them in Twinfield › Invoices and click Unlink together (zero balance).
The checks
- Same administration, and the amounts must cancel each other out exactly.
- Everything must have been sent.
- In Odoo they may not be matched with a payment or another document.
- Posting an unlinked invoice again doesn't send it to Twinfield again.
Unlinking changes nothing in Twinfield. It only makes Odoo and Twinfield show the same again.
Deleted in Twinfield
If someone removes a booking in Twinfield, the daily check notices. The invoice gets Deleted in Twinfield and you choose: send again (as a new booking) or not.
15.Payment status
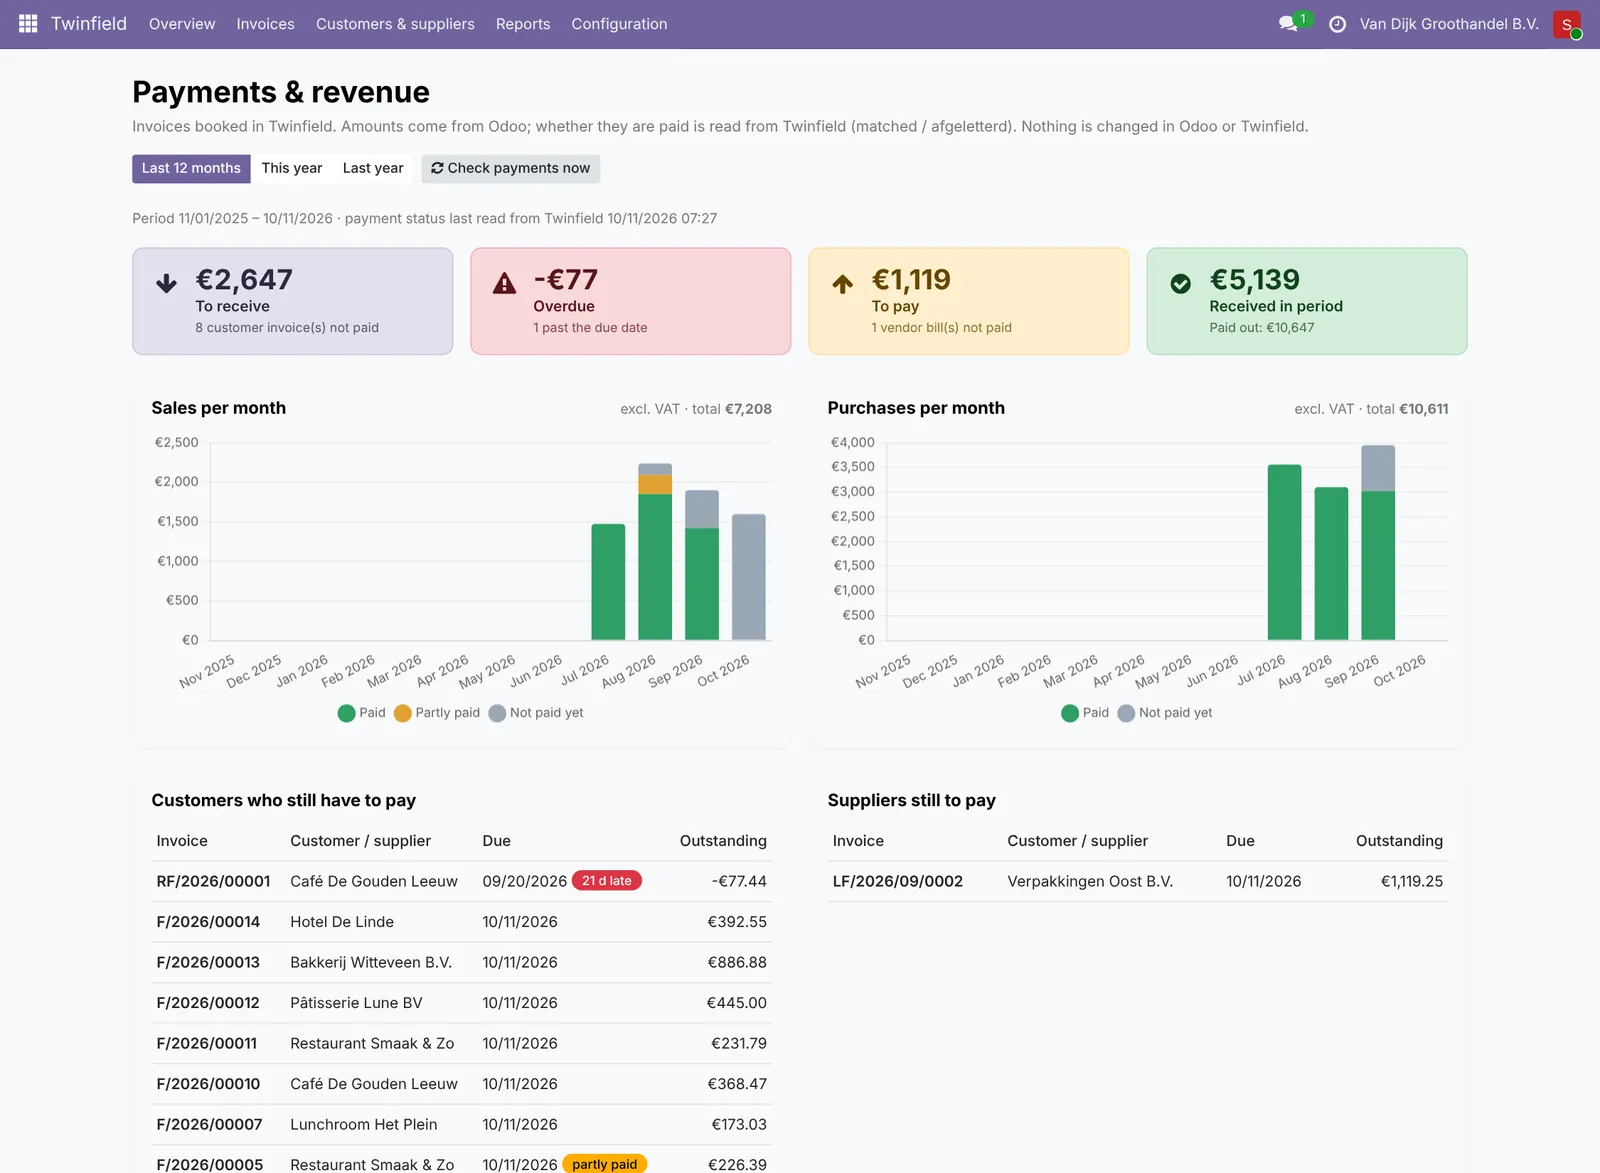
Every hour the connector checks in Twinfield which invoices are paid. You see it on the invoice, in the list Twinfield › Invoices and in Reports › Payments & revenue.
This is information only: Odoo's own payment status doesn't change.
More details
- Statuses: open, partly paid and paid (matched). A booking that is in a payment run in Twinfield keeps its last status.
- Amounts are in the company currency.
- Check payments asks for it right away (at most once a minute).
- The connector only asks about its own booking numbers, over the last 400 days. Bookings by others in the same daybook don't count.
- If Twinfield refuses the question for a daybook, that is written in the log and the status stays as it was.
When something comes up
16.Solving problems
Almost everything solves itself or shows exactly what to do. Invoices are never lost: they wait until it can go again.
- An invoice is waiting: read the message on the invoice. Usually a mapping or a decision about the customer is missing.
- An invoice has Error: the Twinfield tab shows what Twinfield said. Solve it and click Send again.
- Sending paused: the top of the overview shows the reason and what to do.
More details
Sending paused
- Twinfield user disabled or locked, or password expired: enable the user again in Twinfield or choose a new password. Sending continues by itself within the hour.
- Twinfield user deleted or access revoked: click Reconnect on the Connection page and log in with a user that has access.
- Not connected: click Connect Twinfield.
- Terms of use not accepted yet: an administrator ticks the box on the Connection page and clicks Accept the terms of use. Then everything continues by itself.
Closed period
This depends on the rights of the Twinfield user. Twinfield either books the invoice in the first open period (the date stays; the invoice says "booked in another period"), or refuses it. When refused, the invoice gets Error with the button Book with another date. In the Settings you can choose to do this automatically with today's date.
"Twinfield is not accepting requests for a moment"
Twinfield limits the number of requests per minute. Nothing was processed; the connector waits by itself (usually less than a minute) and continues. Buttons like Fetch may not work for a moment; the message says from when they do.
"Could not check this Odoo"
When connecting, the connection service calls your Odoo address back. Check:
- that the Odoo address on the Connection page is right and opens from outside;
- that
/twinfield/verifyis not blocked by a firewall or the web server; - with several databases on one server: that this address opens exactly this database (dbfilter).
"This database is already registered under another address"
Your Odoo moved to a new address. Contact us and we will switch the address.
Still stuck?
Look in Reports › Log and e-mail us with your customer number.
17.Using it safely
The connector protects the access to Twinfield well: your password never goes into Odoo and the access is stored encrypted. A few habits keep it that way.
Your login is yours
A Twinfield login is like a house key: whoever has it can get into everything that user may access. So don't share it, not even briefly with a colleague or with us. We will never ask for it. A separate connection user works best, for example "Odoo connection", with access to the needed administration only. Turn on two-step verification if Twinfield offers it.
Administrators in Odoo
An Odoo administrator can manage the connection. So give those rights only to people who really need them, and check the list when someone leaves.
Copies and backups of your database
A copy of your Odoo database is handy for testing. Just keep in mind that the connection comes along in the copy. Two tips:
- In a test copy, first click Disconnect Twinfield before anyone posts invoices in it. Otherwise those test invoices end up in your real administration.
- Keep backups and copies in a safe place, not in a shared folder, on a USB stick or in an e-mail. A backup also contains the key your Odoo uses to identify itself to the connection service.
Noticed something odd?
No need to panic. Click Disconnect Twinfield, disable the Twinfield user for now and e-mail us. We can block the access of your database right away and help you get going again.
A quick check now and then
The connector sends exactly what is in Odoo. So check in Twinfield now and then that it is right, certainly after changing mappings.
More in the terms of use.
18.Stopping or uninstalling
- Stop for a while: click Disconnect Twinfield. New invoices wait until you connect again.
- Stop for good: disconnect, then uninstall the module in Apps.
Everything already in Twinfield stays there.
More details
The connector keeps everything in its own tables. After uninstalling, the mappings, statuses and log are gone; Odoo's own invoices, relations and taxes are not touched. Disconnecting also revokes the access at Twinfield.
Need help?
Stuck? E-mail us with your ERP2XL customer number (see Twinfield › Configuration › Connection) and a short description, at [email protected].